
Shoes by Robert
Stitching
See Goubitz for a good discussion of stitches and corresponding illustrations.
Side Seams
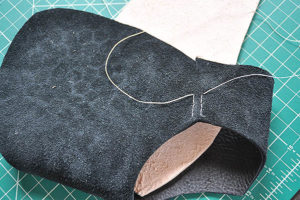
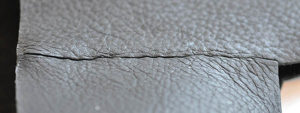
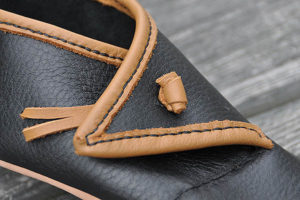
Most types of turnshoes use a side seam to connect the one end of the upper to the other, in order to form the complete circle it make in the end. The two ends butt up against each other, not overlapping.
To make a seam that hides the thread joining the leather, when seen from the outside with the foot in th shoe, lay out the upper flat on a table, so that its flesh side is up and the two ends to be joined are just touching. This will mean that the rest of the upper will be in an awkward position, but it can be flattened so that it's not much of an obstacle to work around.
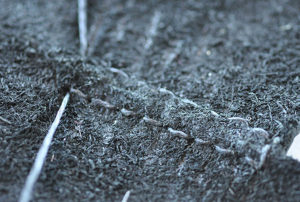
Once the two seams are butting each other, use an awl to make a tunnel down into one piece and out through its edge, then into the edge of the other side, and up out from within the thickness of the leather itself. Repeating this many times will result in a stitch visible only on the inside of the shoe.
Now, to make that tunnel into, through, and out of the leather, you can use a curved awl blade, or a straight one. I'm not sure that any curved ones from the Middle Ages are known, although I suppose they are plausible. I made my first pair of shoes with one, but moved to a straight awl and it was just as easy, if not easier, once I became more familiar with the materials and how the leather can be held and manipulated to get the awl to make the path for the thread.
Once you have hole, you need to push a threaded needle through it, and then the other needle on the far end of the thread back through the other way, using the same path. Sometimes it's necessary to widen the tunnel a bit to get the second needle back through. Use round-ended needles for this, such as #004 harness needles. (These can be purchased on eBay in packets of 25 for just a few dollars.)
If you prefer to be more authentic, though, learn how to make waxed ends. Instead of using a metal needle, you would join your thread to a boar bristle. That skill takes a bit of practice and dexterity, to be sure, but in my opinion the trouble is worth the time and attention. Bristles can go through smaller holes; they follow the curve of the awl's tunnel, and using them is far easier on hands, wrists, and elbows compared with a metal needle and pliers needed to push or pull it through the leather. See the videos for good coverage of the technique from various angles and perspectives. You can purchase boar bristles on eBay by the 10-, 25-, or 100-gram bundles for just a few bucks.
Also, it's just really cool to say that you make shoes with boars' bristles!
Uppers / Soles
NOTE: the proper way to attach the upper to the sole involves the use of a last, one for the left shoe and one for the right. I have not yet made a last, nevermind used one for this part of shoe making. If you haven't got a last, then just use a flat table and follow these steps.
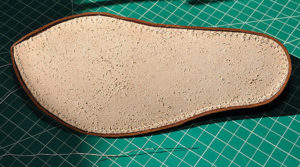
Working with the sole and the uppers inside-out, use quilter's clamps or pins to hold the two pieces together, so that they stay in line as you stitch them to each other.
When making my various 14th-century shoes, I started the join at different points around the shoe and have not found the choice to matter. On the 10th-century shoes, though, I found it best to start at the very tip of the heel wedge and work down both sides simultaneously using two threads, each having two needles or waxed ends. (I would do a few inches on one side, then a few on the other, progressing them in parallel until they met somewhere on the toes.)
Like the side seam, the upper/sole seam has the needle go down through the sole's flesh side, then out through its own thickness. But instead of going into the upper's thickness, it punctures the grain side of the leather and comes out through the flesh side. The opposite needle, then, follows the same hole back through: flesh side, grain side, sole thickness, emerging from the sole's flest side. Continue making holes and passing both needles and their thread through them until you complete the entire circuit of the sole.
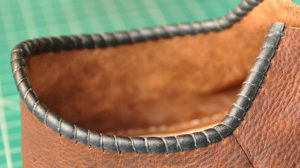
Topbands
Some remains of medieval shoes have holes running parallel to the opening, and most authors attribute these to topbands. So far I have made three pairs with topbands with saddle stitching, one with a straight line, the others with designs made by varying the angles of thread from one hole to another. See For Viking Age Royalty and For the Skóla Auction for photos. A fourth pair (For a Beekeeper), made later, employed a binding stitch, which Grew indicates as the proper type for a topband.
I find it easier to apply the topband while the uppers are still flat, but they can be attached to the show after it has been turned. A set of quilter's clamps will keep the topband in place during stitching. I find them much easier to use than, say, safety pins but they do tend to catch the thread during sewing.
Last updated April 16, 2018.